C100/RetroCam Observing Procedures
Contents
-
1. Initialize System
2. Calibrations and Telescope Setup
-
2.1 Dome Flats
2.2 Sky Flats
2.3 Telescope Zero-Point
2.4 Telescope Focus
2.5 Darks
-
3.1 Supernovae
3.2 Standard Stars
3.3 Guiding
5. Copying Data to a CSP Machine
6. Before You Go to Bed
7. Linearity Tests
1. Initialize System
- Field of view is now: ˜ 3.4' arcmin
1.1 Instrument Control Computer: ARACHNE/CSP5 (Windows XP)
- User name: cspuser
- Password:
- Double click on the RetroCam icon.
- A window called Database Initialization pops up:
- Check Camera, Telescope, Guider, and FilterWheel ar all ONLNE.
- TemperatureControl should be OFF.
- Type in observer's name in Observer.
- Then click OK
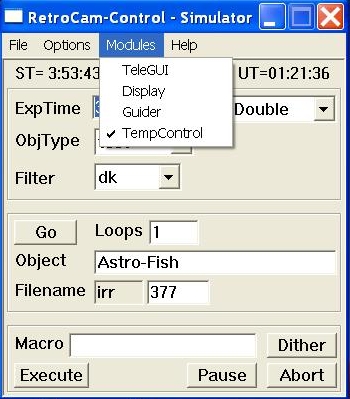
- A window called RetroCam-Control pops up.
- Go to the Modules tab and open the TeleGUI and,
Display.
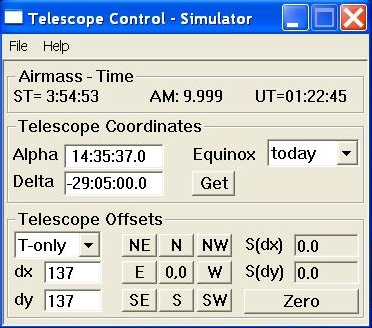
Once you open TeleGUI the UT time updates.

- In Telescope Control window go to the File tab and
open SkyMap, Airmass, and ObjectList.


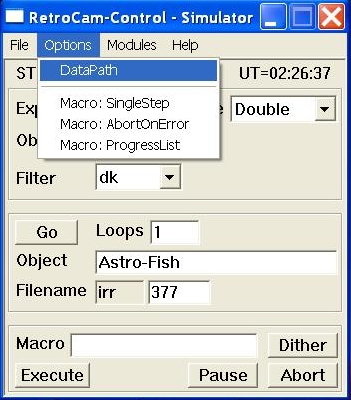
- In RetroCam-Control window go to the Option tab and
select DataPath.

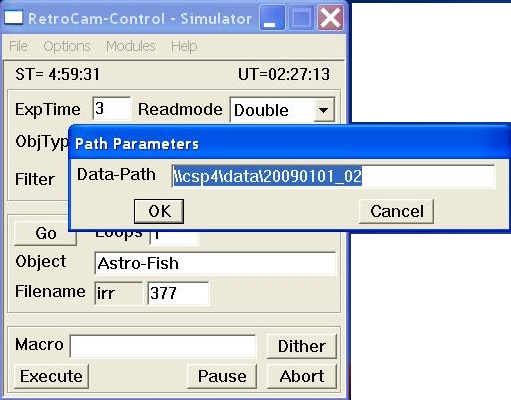
- In the window that pops up write the directory in csp4 where the data
will be directed. Use the CSP naming convention.

For example, for the night starting on Sep 06 2005, type:
"\\200.28.147.133\data\20050906_07".1.2 Data Reduction Computer (csp4) (Linux)
- User name: cspuser
- Password: available on the telescope
- Open a terminal (you can use the icon in the task bar).
- Create a directory for the night and make it writable by
csp5. For the example above:
> cd /data
> mkdir 20050906_07
> chmod 777 20050906_07
- Open an IRAF window by clicking on the "drawer" icon in
the task bar.
Or in the terminal, type:
> cd
> xgterm -sb -e cl &
- In the IRAF terminal, go to the data directory, e.g.:
cl> cd /data/20050906_07 - See the use of observing scripts in Section 4 below.
- Open DS9 from the Linux terminal:
> ds9 &
1.3 Check UT time
- Check the current UT time (e.g, the USNO web page).
- If the Universal Time at the TCC-Guider PC differs from this more than a few seconds, ask the telescope operator or the daytime technitian to try fixing it.
- It is very important that you check the UT and ST are right (within some seconds) in the Retrocam-Control window in csp5.
- If this is not the case, restart the RetroCam control program in csp5 as described in Section 1.1.
- Once you re-open the TeleGUI module the UT should update and be close to the time in the TCC-Guider PC.
Back to top
2. Calibrations and Telescope Setup
- Ask the operator to request the telescope to be positioned to the white spot for domeflat calibrations
- In Retrocam-Control window set:
- Exptime = 5
- Readmode = Double
- ObjType = dflat
- Loops = 15
- Object = Domeflat (no space)
- Turn ON quartz light.Max voltage is 480.
- Y:
- J:
- H: New voltage should set by testing the lamps volt.
- Go to the dome and check both the telescope and the quartz light points to the white screen, and that no shadows are cast on the screen.
- In Retrocam-Control window select a filter and click the Go button to start a loop of flats.
- When done, turn OFF quartz light.
- Click Go again to get "lamp-off" flats.
- Change filter and lamp level, and repeat the two previous steps.
- When the sequence of dome flats is complete, check that the quartz lamp is OFF.
- Ask the operator to go to an empty field. Beware that some of these fields are dark clouds in the Milky Way which contain plenty of stars in the NIR.
- In Telescope Control window set dy = 10 (10 arcsec steps).
- In RetroCam-Control window set:
- Exptime = 5
- Readmode = Double
- ObjType = tflat
- Filter = Hc
- Loops = 2
- Object = Skyflat (no space)
- Start a test exposure with Go. Repeat until you have gone down below 20,000 ADU. Make sure that average counts are indeed going dwon between subsequent integrations. If not, the chip is saturating.
- Change Exptime = 5.
- Reset counter in Filename to first unused number you had before the tests.
- Push Go to start the first flat.
- Push the N or S buttons in Telescope Control window between exposures.
- Alternatively, you can do the offsets by running a dither macro:
In RetroCam-Control window press Dither and select
- Dither-Pattern = rot-5
- Dither-Step = 10
- Guider = none
- Take at least five (5) images.
- Change Filter to Yc and repeat the procedure above.
- Take at least 5 images with 8,000 to 20,000 ADU, and offsetting the telescope between them.
- Finally, go to Filter = Jo and move the telescope 2 or 3 hours West.
- Try to get 5 images in Jo with high counts and few stars.
- Ask the operator to point to a bright star for the zero-point
- In RetroCam-Control window set:
- Exptime = 3
- Readmode = Double
- ObjType = test
- Filter = Yc
- Loops = 1
- Object = Test
- Take an image with Go.
- In the Display window click on the center of the bright star.
- In the same window click on Center Telescope.
- In Telescope Control window click on the 0,0
button.
The telescope will now center the bright star. - Ask the operator to do the 'CSET'.
- Same focus value will work for Y and H filters, while an offset of +0.15 units is needed for J. As an example, for a temperature about 8-9 degrees, the focus is near 43.00 for Y and H, and 45.15 for J.
- If the focus is fairly good, ask te operator to start a sequence,
take a single 10sec image, and wait for the operator to change the
focus value
- Exptime = 10
- Filter = Yc
- Loops = 1
- ObjType = test
- Object = Test,
- Display the images in csp4 and run imexamine and its commands 'r' and 'e' to see the size and shape of point-like sources.
- Tell the operator what the best focus was so that he does an fset.
- In the RetroCam-Control window select:
- Readmode = Double
- ObjType = dark
- Filter = dk
- Loops = 15
- Object = Dark
- Set one of the required exposure times in ExpTime.
- Click Go to start taking the darks.
- Repeat with every required ExpTime.
2.1 Dome Flats
2.2 Sky Flats
2.3 Telescope Zero-Point (CSET)
2.4 Telescope Focus
2.5 Darks
-
Darks may be taken in the afternoon if the temperature is not much
higher than the expected one for the night.
Else, they should be taken in the morning, or during the night in case no object can be observed.
Darks should be taken every night with each exposure time used that night.
Therefore, you may need to add darks in the morning, once you know which exposure times you have used.
Note that this includes all the exposure times used for twilight flats.
Back to top
3. Observing
- Check the current list of targets and exposure times for RetroCam.
- Check the target RA order and priorities. Also look at the finding charts and the airmass plot, if available.
- In the Object List window go to File and Load.
- Select the file csp.objects and click Open.
- The current list of SNe being followed is displayed.
- You can use the buttons to Add, Edit, or Remove an object.
- Remember to save your changes or else you'll lose them when you close the application.
- The Preview button shows the situation of the selected target in the Airmass and the Skymap windows without having to point the telescope to the object.
- The SendTo button is now working for sending the target coordinates to the TCS.
- Select an SN and send it for the operator to move the telescope to the target.
- When the slew is complete, press the Get button in the Telescope Control window in order to have the right coordinates RA and DEC written in the image headers.
- To check the pointing, in the RetroCam-Control window set:
- Filter = Yc or Jo
- Exptime = 10
- Loop = 1
- ObjType = astro
- Object = SNYYYYaa (no spaces; YYYYaa is the IAUC or temporary SN ID).
- Take a test image by clicking on Go.
- Check that the field is the one shown in the finding chart.
- Remember that the coordinates in NIR not necessarily match those given in the yellow table.
- If you need to correct the pointing, use the dx and dy offsets and the directions panel in the Telescope Control window. These offsets will be applied in arcseconds; the image scale is 0.201 arcsecs per pixel.
- The upper-left (NE) quadrant should be avoided because it contains several dead spots.
- Also check that the SN and some of the field stars will end up having decent counts and not saturating with the exposure time to be used.
- Reset the Filename counter to the value previous to the test, and set Exptime, Loops, and Macro as indicated in the target list of the night.
- To define the Macro, press Dither and select the options of Dither-Step, Dither-Pattern, and Guider. Make sure you select Guider = auto.
- Set Readmode = Quadruple for filters Yc and Jo, and Readmode = Double for filter Hc.
- Start a dither sequence by pressing Execute in the RetroCam-Control window.
- When the sequence is done, you may need to offset the telescope as indicated in the Beam Switch column of the target list. Or as from now on, sky images shall need to be taken, for this do an offset so that the galaxy if OFF the field of view.
- Repeat this procedure with every requested filter.
- Keep in mind that each filter may require a different dither macro.
- Also remember to apply the focus offset when you change from/to J.
- Make use of the quick-processing scripts described in Section 4 below to check the quality of the data and perform quick photometry.
- If the night is photometric, observe at least 3 or 4 Persson Standard stars.
- In the Object List window go to File and Load.
- Select the file persson.objects and click Open.
- The list of Persson standards is displayed.
- Pick a star from this list with J magnitude between 10.8 and 12.0.
- Make sure the standard stars you observe in one night cover a wide airmass range between 1 and 2.5.
- Select an STD. from the object list and SendTo the TCS, and tell the operator to slew.
- When the slew is complete, press the Get button in the Telescope Control window in order to have the right coordinates RA and DEC written in the image headers.
- In the RetroCam-Control window select:
- Exptime between 5 and 10
- Readmode = Double
- ObjType = standard
- Loops = 1
- Object = SJ#### (no space, #### is the number of the standard)
- Take a test exposure with Go and check the field and exposure time.
- You may need to move the star off the quadrant divisions. If so, in Telescope Control set dx and dy to something like 50 and move diagonally in the chip. This offset should be now smaller. Try with smaller offsets and cross-check.
- Avoid the upper-left (NE) quadrant. It cointains spots of dead pixels.
- If the star is too bright, you may need to defocus slightly the telescope so that it doesn't saturate.
- In the RetroCam-Control window select the macro by
clicking on the Dither button. Then select:
- Dither-Step = 15''
- Dither-Pattern = rot-5
- Guider = none
- No guiding is required.
- Launch a dither sequence by clicking on the Execute button.
- Change filter and repeat the previous step until you have done Yc, Jo and Hc.
- Remember to apply the focus offset when changing from Y-H to J.
- Guiding is now done automatically by the telescope. Once you're
pointing to your target, when selecting the macro on
the Dither, choose guider=auto.
Then the operator will search for a guiding star and put it into the guiding box and shall start guiding, and when ready, the observations can start
- A new improved SkyMap is ready. A link shall be added when the LCO web site is updated with the info and snapshots.
3.1 Supernovae
3.2 Standard Stars
3.3 Guiding
Back to top
4. Quick-Processing IRAF Scripts
- A series of IRAF scripts are available in csp4 to help the observations.
- The scripts are loaded automatically when you start IRAF. The task definitions are given in the 'loginuser.cl' file in ~/iraf/.
- The script files themselves sit in ~/iraf/retro_quick/.
- The following tasks are available:
- dis:
Displays an image without having to type in the whole name.
Usage: cl> dis num loo
where 'num' is the frame number, and loo is the loop number. - disi:
The same as above but it starts imexamine.
Usage: cl> disi num loo - dp:
Displays the difference between two "_001" frames.
Usage: cl> dp num1 num2
where 'num1' and 'num2' are the frame numbers of the images to be subtracted. - pdiffi:
Displays the difference between any loop of two frames and starts imexamine.
Usage: cl> pdiffi num1 num2
by default, it subtracts loops "_001" of both frames.
You can edit the optional parameters 'l1' and 'l2' to use other loops. - avgo:
Displays the difference of two frames after averaging all the loops in each one.
Usage: cl> avgo num1 num2
You can modify the optional parameter 'scl' to change the scaling factor to be applied before subtraction --- scl = "mode" is the default. - sky_stats:
Shows the median and mean sky level for a range of frames. Useful to check flats.
Usage: cl> sky_stats num1 num2
where 'num1' and 'num2' give the range of frames to analyze. - p_fid:
Mark a fiducial star used to align dithered images.
Usage: cl> p_fid r num1 num2 aut/man
where 'num1' and 'num2' give the range of frames in a sequence. Options 'aut' or 'man' allow to make the program select a star, or the user to mark it. The task will write the star position in the headers of frame num1. - p_fx_asecs:
Correct the RA and DEC offsets between frames that are written in the header keywords ASECS and DSECS.
Usage: cl> p_fx_asecs r num1 num2
where 'num1' and 'num2' give the range of frames in a dither sequence. The user will be prompted to mark the same star in all frames (after averaging the loops). r_quick will usually fail if this is not done in advance. - p_mimdel:
Delete a range of frames of some kind.
Usage: cl> p_mimdel pre num1 num2
where 'pre' is a frame prefix ('icr' for loop-combined, 'isx' for sky-subtracted, etc.), and 'num1' and 'num2' give the range of frames in a dither sequence. Since p_fx_asecs fixes the headers of 'irr' frames only, you will need to delete the 'icr' frames before running r_quick, in order to get the right offsets. - r_quick:
Produce a quick and dirty stack of a range of frames.
Usage: cl> r_quick num1 num2
It produces a sky by averaging the frames. It asks the user to mark a few stars with 'a' in imexamine. It may fail if the dither steps are too large (>30''), or if the guider star got lost.
- dis:
- To make a fast combination of a dither sequence:
For example, a sequence of frames 10 to 18.- p_fid r 10 18 aut
- p_fx_asecs r 10 18
- p_mimdel icr 10 18
- r_quick 10 18
Back to top
5. Copying Data to a CSP Machine
- At the end of the night, tranfer the data from csp4 to csp3.
- Open a terminal window in csp4.
- Go to the directory with the data of the night, e.g.:
> cd /data/20050906_07 - Do a secure copy to csp3 giving your user name in that
computer, e.g:
> scp -r ../20050906_07 username@csp3:/data/ir - You will be asked for your password in csp3.
- The link should be fast enough to copy more than 100 MB per minute.
- While the secure copy runs, you can proceed to the next item.
Back to top
href="#rep">below)
Back to top
6. Before You Go to Bed
- Fill in the LCO Night Report.
- Add a line requesting the staff to switch to the CCD camera, if applicable.
- To make sure the request is heard, stick a note on the telescope console directed to the daytime technicians so that they see it in the morning.
- Fill in the CSP Night Report. (User name and password required. If you are not a CSP member, please be so kind to send an e-mail to Gastón Folatelli, gfolatelli@lco.cl, instead.)
- In the "Night time report" field, inform about objects observed and calibrations taken. Give details about weather conditions and describe technical problems, if any.
- Fill in the CSP SN Log of the night. (User name and password required.)
- This form allows you to input all the SNe of the night at once in a comma-separated list.
- The SN names can be introduced in a variety of formats. The program then completes the names in the standard form.
- In the Filters field you can input a generic 'YJH'.
- Click on Submit and an editable list will appear.
- Modify the fields according to what you observed in the night.
- In particular, check the Filters and Weather fields because these may change from SN to SN.
- The rest of the fields will generally have the same information for all the SNe.
- Click on Submit to send the logs to the database.
- To burn the data to DVD you have three alternatives:
1- Use growisofs in csp4 (Linux).- Follow these instructions by David Murphy.
- Put only the irr_*.fits in a subdirectory. E.g.:
> mkdir todvd
> mv irr_*.fits todvd/ - Check the size is less than 4.3 Gb:
> du -h todvd - In the unlikely case that the data are more than this value, separate them in two directories and burn two DVDs.
- Burn:
> growisofs -Z /dev/cdrom -R -J -apple todvd - Do not run heavy processes (e.g., image processing) while burning. Other light processes like mozilla, editors, etc are not a problem.
- Burning takes about 15 min for a whole DVD (4.3 Gb), at speed=4x.
- When done, the DVD is ejected and loaded again.
- Take the DVD from the drive by pushing the eject button.
2- Use RecordNow DX in csp5 (Windows).- Close all other applications. (Yes, do you like Windows...?)
- Double click on the RecordNowDX icon on the desktop.
- Choose the option Make a Data Disc.
- In the following window click Next.
- Click Add Files and Folders.
- Click the drop down arrow in Look in.
- Select data on 'Linux Samba Server ...'.
- Select only the irr_*.fits files with drag and drop.
- Check the total size of the stuff to be burnt is less than 4.3 Gb.
- In the unlikely case that the data are more than this value, leave some files to a second DVD.
- Click Next. You'll be warned not to run other applications. Click ok.
- The DVD burning will start right away!
- Don't run other processes while burning.
- This program by default verifies the written data after burning. This is a nice feature but it takes twice the time.
- When done, the DVD will be ejected.
3- Use K3b in csp4 (Linux):- Open K3b either from a terminal:
> k3b &
or by clicking on the icon at the task bar. - Select the option Create Data DVD Project.
- In the upper half of the window select the files to be burnt. Use the left-hand mouse button in combination with the Shift and Ctrl keys.
- Select irr_*.fits files and drop them in the lower half of the window.
- Check the total size of the stuff to be burnt is lees than 4.3 Gb.
- In the unlikely case that the data are more than this value, leave some files to a second DVD.
- Click on Burn.
- Under the Writing tab, select:
- Speed = 2x
- On the fly
- Verify written data
- At the Volume Desc tab you may input a Volume name for the DVD (e.g.: '20050906_07 - RAW'.)
- Under the Filesystem tab, select:
- Generate Rock Ridge extensions
- Generate Joliet extensions
- Click the Burn button to start recording.
- After the data are written and verifed the DVD will be ejected.
- Label both DVDs with:
C40'' + RetroCam
Raw data
Observer's name
Directory name (e.g. "20050914_15/")
Total size
Copy number (1 or 2)
DVD number, if there is more than one for the night. - Put the DVDs in plastic cases and send one of them to Gastón at El Pino along with the log sheets.
- Keep the other DVD in Nidia's office at the ASB.
- Plastic cases can be found in Nidia's office.
6.1 Fill in Night Report and SN Logs
6.2 Burn two DVDs
Back to top
7. Linearity Tests (Only for Cloudy Nights)
- Wait until it is dark outside and close the dome.
- Turn OFF the incandescent dome lights from the console.
- In TCC-Guider PC, type 'DOMEFLAT' to point the telescope to the white screen.
- In RetroCam-Control window set:
- Filter = Yc
- Readmode = Double
- ObjType = dflat
- Loops = 1
- Object = Linearity
- Turn ON the quartz light from the grey box over light blue rack and adjust voltage so that you get 2000 ADU in 10 s (550 V should be OK).
- Take the following series of exposures, changing
ExpTime each time to the values below, and pressing
Go.
ExpTime values: 10, 3, 10, 7, 10, 15, 10, 20, 10, 30, 10, 45, 10, 60, 10, 75, 10, 90, 10, 105, 10, 120, 10, 135, 10, 150, 10, 165, 10, 180, 10, 195, 10, 210, 10, 225, 10, 240, 10, 255, 10. - You must reach about 48,000 ADU in 255 s.
- Turn the quartz light OFF and take Darks at each Exptime
above, using Loops = 1.
In RetroCam-Control window set:- Filter = dk
- Readmode = Quadruple
- ObjType = dark
- Loops = 1
- Object = Dark
- Only ONE dark at 10s is needed.